Showing posts with label how. Show all posts
Showing posts with label how. Show all posts
Wednesday, October 29, 2014
How to Upgrade Android OS
Although it can be done alone, but there are still many users are confused android operating system update. In fact, many who follow the troubleshooting tips OS updates are not clear so damaged, it is caused because they did not install the OS aimed at the mobile phone. For those of you who want to securely update the OS android please consider the following tips.
How to Upgrade Android OS.
- Login menu settings
- Select the phone about
- Next select the operating system
- Next select system updates
- The phone will automatically check if there is an OS update for your phone or not
- When an update is available, it will automatically offer to update its existing and select ok
- You wait Next live update process is completed, usually at the end of the update will be a command to reboot the phone.
How to update the android OS on top of our already proven itself and managed to safely update the operating system, so do not hesitate to try it. Its just that when doing an OS update, we recommend you use a fast internet connection and stable, Good Luck.
Friday, October 10, 2014
Odin How to Flash Install I9100XILA2 Android 2 3 6 Stock ROM on Samsung Galaxy S II 2
The firmware update build I9100XILA2 is an upgrade to Android 2.3.6 Gingerbread on Samsung Galaxy S II. This is the newest official firmware update by Samsung releases this year with a build or modified date of January 13, 2012 . This firmware was officially rolled out in Italy. One thing new on this firmware is that it features a new lockscreen that looks like an Android Ice Cream Sandwich with touchwiz. There is an improvement in battery life usage, battery drains too slow which is a bit impressive. Some several features were added, more faster and much better than previous build I9100XXKL1.
Sneak peek of the new lockscreen.

Firmware details:
PDA: I9100XILA2
CSC: I9100XWKI1
PHONE: I9100OXIK1
Kernel: 2.6.35.7-191000XILA@-CL889496
root@DELLBUILDER01 #2
Version: Android 2.3.6 Gingerbread
Build: January 13, 2012

credits to turborider for the screenshots
Some few other details of changes.
- Various bugs were fixed from previous version
- Android 4.0 styled Lockscreen Android 4.0 styled lockscreen lockscreen with similarity from Galaxy Note
- Wi-Fi chip bug has been fixed
Flashing the Stock ROM I9100XILA2 with Odin Downloader tool.
This method if you are having issues updating with KIES or if you wanted to install it if you came from other region outside Italy.
This guide uses the original stock I9100XILA2 with Italy default CSC file ITV.
Grab the stock ROM via Sammobile:
GT-I9100_I9100XILA2_I9100OXIKK1_ITV
Extract it after download, the password is: samfirmware.com
If you want to upgrade but came from other region , you can use the Frankenstein version which is by flashing desired CSC file that is built for your country. You can grab it here at Intratechs Frankenstein Firmware file.
Before proceeding, do things as follows to avoid any future problem issues.
- Make a back-up copy of all important data stored from the device.
- Make sure that the battery is at-least 80% charge.
- Use a good condition USB cable wire a PC with a working USB serial ports.
2. Load the extracted file on the PDA field.
Click on the PDA button then select the I9100XILA2_I9100XWKI1_I9100OXIKK1_HOME.tar.md5
DO NOT check the RE-PARTITION" checkbox.
3. Then set the phone in Download Mode: Press and hold Volume Down, Home and Power button.
4. Once in Download mode, connect to PC,.
5. When Odin recognize it and the phone is properly connected, hit the "START" button.

6. Wait until the flashing completely finish.
 Thats it! if you experience bootloops after flashing. Do full factory reset or wipe data cache.
If you want to get root, look for chainfires CF-ROOT kernel released at XDA.
Sneak peek of the new lockscreen.

Firmware details:
PDA: I9100XILA2
CSC: I9100XWKI1
PHONE: I9100OXIK1
Kernel: 2.6.35.7-191000XILA@-CL889496
root@DELLBUILDER01 #2
Version: Android 2.3.6 Gingerbread
Build: January 13, 2012

credits to turborider for the screenshots
Some few other details of changes.
- Various bugs were fixed from previous version
- Android 4.0 styled Lockscreen Android 4.0 styled lockscreen lockscreen with similarity from Galaxy Note
- Wi-Fi chip bug has been fixed
Flashing the Stock ROM I9100XILA2 with Odin Downloader tool.
This method if you are having issues updating with KIES or if you wanted to install it if you came from other region outside Italy.
This guide uses the original stock I9100XILA2 with Italy default CSC file ITV.
Grab the stock ROM via Sammobile:
GT-I9100_I9100XILA2_I9100OXIKK1_ITV
Extract it after download, the password is: samfirmware.com
If you want to upgrade but came from other region , you can use the Frankenstein version which is by flashing desired CSC file that is built for your country. You can grab it here at Intratechs Frankenstein Firmware file.
Before proceeding, do things as follows to avoid any future problem issues.
- Make a back-up copy of all important data stored from the device.
- Make sure that the battery is at-least 80% charge.
- Use a good condition USB cable wire a PC with a working USB serial ports.
Disclaimer: Use this guide at your own risk. We shall not held any responsibility for any damage might cause to your smartphone.1. Run Odin v1.85
2. Load the extracted file on the PDA field.
Click on the PDA button then select the I9100XILA2_I9100XWKI1_I9100OXIKK1_HOME.tar.md5
DO NOT check the RE-PARTITION" checkbox.
3. Then set the phone in Download Mode: Press and hold Volume Down, Home and Power button.
4. Once in Download mode, connect to PC,.
5. When Odin recognize it and the phone is properly connected, hit the "START" button.

6. Wait until the flashing completely finish.

If you want to get root, look for chainfires CF-ROOT kernel released at XDA.
Tuesday, October 7, 2014
How to Watch 2012 Hot Christmas Movies on Android Tablets

Method 1.Download Hot Christmas Movies from Some Website
You can download free hot Christmas movies for Android Tablet from the following websites imp4hubor or itabmovies. Both of the two websites offers the free download movies in MP4 formats. And you can also subscribe the website and requires the movie you want. The flaw is that some good holiday movies are offered and the numbers of movies is not in large number.
And there are also other reliable websites Netflix, Clicker, ZumoCast, YouTube, HuluPlus,ABC and CBS network websites offering free online movies, you can also download the movies but you should pay for it. One thing you should take care is ensure the website is safe and you also need to connect the Internet.
Tip:The majority of people choose this method to watch the Christmas movies with family, however, there is a problem for this one. The movie formats. You know, there are no tablets which can support all the formats, when you cannot play the movies you download on your Android tablet, you are probably need an Android tablet converter to help you.
Method 2: Install Movie Apps to Stream the Movie
If you just don’t like to browse the websites then you can install some movie apps to watch the movie on your Android tablet. You can choose Netfix, IMDb Movies & TV, VLC Direct Pro and other choices.
Tip:In this way, you can enjoy the Christmas movies better, but you need to connect to the web unless you have downloaded the movies.
So, it is you turn to choose your favorite Christmas Movie for your Android tablet.
2012 hot Christmas Movie suggestion: Life of Pi,Whatever Happened to Baby Jane? Home Alone,The Holiday,Jingle All the Way,How the Grinch Stole Christmas,Miracle on 34th Street,The Polar Express,The Simpsons Christmas,White Christmas
Related article:
- How to Watch MKV Videos on Kindle Fire HD
- How to watch videos on Google nexus 7 or other Jelly Bean devices?
Monday, September 22, 2014
Google Blogger Sitemap to Google Search Engine How to submit it
Google Blogger Sitemap to Google Search Engine How to submit it
As we all know while we want to search some thing on Google search Engine, the Googlebot searches the words mentioned in our search request. In every blog or web site, generally people think that the Googlebot searches all the posts irrespective of the date of posting and irrespective of the number of posts. If we want the googlebot to displayall our posts in search results, we have to make some arrangements at our own. This arrangement is to submit a site map to the Google search Engine. The site map can be submitted very easily. First of all we need a site map. There are so many sites which provide the service to prepare site map free of cost. Google accepts site maps prepared by all the sites who are member of sitemap.org and you can even submit a site map in the form of a text file but to get a sitemap from a site is easy.

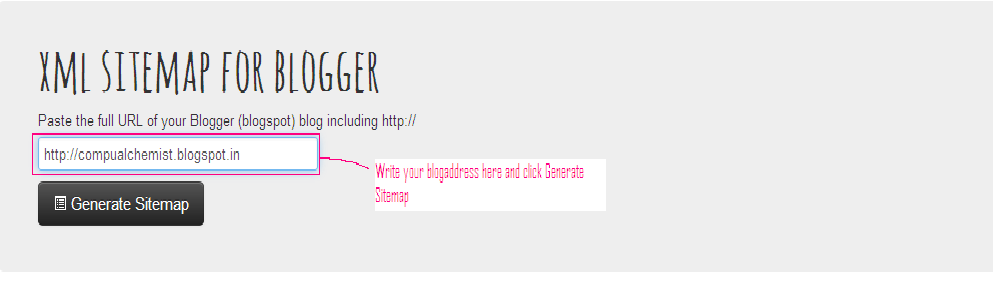
To generate a site map of your blog, click GOTO to open the site map generating site. The site will open and ask you to “Paste the full URL of your Blogger (blogspot) blog including http://”. Enter the complete address of your blog –
Now click the black coloured button ”Generate Sitemap”. Within seconds your blog’s sitemap will appear like one given below-

Wednesday, September 17, 2014
How To Change Blogger Post URL and Custom Permalink URL
Whenever we publish a new post, Blogger automatically generates the post URL according to the title of the blog post. For example, if the post title is How to Create Custom Post URL in Blogger? then Blogger will generate http://www..com/2013/07/how-to-create-custom-post-url-in-blogger.html as the post URL. If you want to change this URL to a small SEO friendly one here comes the solution.
Recently Blogger introduced an option named Permalink in Post settings to edit the post URL to your desired one. In this post I included the simple steps to use custom permalink in Blogger blog. Here are the steps.
Steps:
Note : If you have Permalink Option in your Blogger Post Settings Start fromStep 2.
1. Open a post you wish to edit the URL or Create a New Post.
(If you are editing a published post, then click on Revert to draft button to enable Permalink editing.)

2. Then click Permalink in Post Settings.
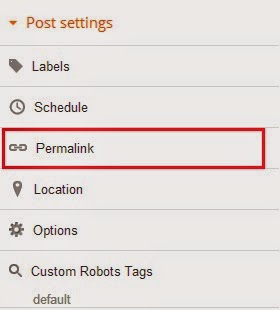
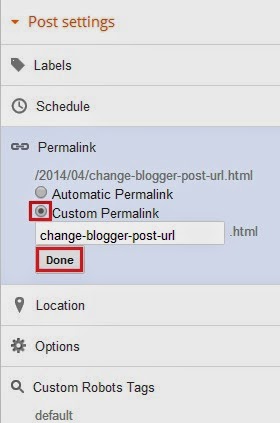
3. Now check the Custom URL radio button and type the new post URL in Custom URL text field. After changing the URL dont forget to click Done!
4.Finally, Click Publish .
Thats it...Now check the post URL it will be changed to the modified one !
Note : If you are changing URL of a old post, please note down the old URL before changing to a new one. Because your old post URL may be submitted to search engine or social websites. So If any one come to your blog using the old URL he will get a 404 not found error. Dont Worry ! you can Redirect your old URL to new URL using Custom Redirects feature of Blogger.
Monday, September 1, 2014
How to Manually Upgrade via ODIN Sprint Samsung Galaxy Tab to 2 3 4 Gigerbread Update
Some of Sprints Samsung Galaxy Tab users experiencing an update error like attempting the "Update Firmware" but the Tab stays busy for a minute and then eventually stops with the following error message:
"The Firmware update could not be completed. Please try again later. If the problem persists, you may need to contact Customer Service".
"Error: Connection Error"
and or when attempting the "Update Android" it will only shows: "Your system is currently up to date."
Others may also having trouble updating it via WI-FI since many users having a wi-fi only version, and can only updated via 3G while the WI-Fi is turned Off. So, it needs to turn off wifi, and use 3G to get the update.
This is originally posted by ktran1588 over XDA for some reason and a solution to those who are having trouble updating their Sprint Samsung Galaxy Tabs. This is also an option to those who bought a refurbished Sprint Galaxy Tabs that has a WiFi only version.
Warning: You will lose root on the tab, and there is not a solution to root Gingerbread yet...
Does applying it cause you to lose any apps or files on the tab? Make a back-up copy of all important files before proceeding.
First you have to have stock EB28 on the tab prior to the update.
Check the software version on your phone:
1. From the Home screen, press Menu, then tap Settings
2. Flick up to scroll down, then tap About Phone
3. Software version is displayed under Baseband Version
4. Galaxy Tab shows like the following information:
Hardware version SPH-P100.08
Model number SPH-P100
Firmware version 2.2
Baseband Version S:P100.08 S.EB28
Kernel version 2.6.32.9
Build number SPH-P100.DJ30
If tour device firmware is not yet on EB28 follow these guide:
1. Download the E24 flasher
2. Find a copy of Odin (1.3 worked for me)
3. Extract the flasher, look in ModelsBinary, strip the .MD5 extension from the file SPH-P100.EA24.SECURE.REV07-FULL_CL871413.tar.md5
4. Load Odin
5. Connect device via USB
6. Reboot into recovery (power off, hold power and down volume keys or do a "adb reboot download")
7. Select the newly renamed .TAR file in the PDA slot in Odin
8. Select start (flashing should commence)
9. Boot, then you will be prompt for EB28 update, allow the EB28 update to complete
Then follow these step to update to Gingerbread:
1. Download the Gingerbread update (Special thanks to pvtjoker42 for this. Source)
2. Copy the update_from_EB28_to_EF17.zip file to the root of your SD card, rename it to update.zip
3. Reboot into recovery (power off, hold power and up volume keys or do a "adb reboot recovery")
4. Use volume rocker to select apply update.zip (or whatever)
5. Touch the home button to select

NOTE: If you got stuck during the update, try to reformat the sd card with your tab or use a different one, then try again.
Read the full procedure originally posted at XDAs thread here:
http://forum.xda-developers.com/showthread.php?t=1156605
Tuesday, August 26, 2014
How to maintain security in Blackberry Z10

In the current era, the smartphone has become the best friend for some people. Naturally, because the cell phone has become the only tool that will be easier for us to communicate, and some even call it a replacement for a PC, for a variety of important data stored on the smartphone. And Surely you store valuable information on your BlackBerry, such as data business relations, important emails, to your precious files. For that, the BlackBerry security would be very important for the sake of preserving the confidentiality of your personal files to prevent loss of data that matters to you.
Unfortunately, BlackBerry 10 only offers one option for securing the phone from those who irresponsible. The way is by using an array with the secret of words or phrases we commonly call Password. The following are simple steps to secure your BlackBerry Z10, as released from CrackBerry:
- Enable Encryption In Contacts, and Files. Go to Options> Security> Encryption, Encrypt section mark. Media contact and check the option file. Press the back button, click Save.
- Backup Data to Computer. You need the BlackBerry Desktop Software to backup the data on your BlackBerry to your computer. This program can be downloaded for free on http://id.blackberry.com/services/desktop/. run the BlackBerry Desktop Software, click "Back up now" adjust the settings to your needs. Click "Back up".
- Backup Data to a Memory Card. The main menu click Setup> Device Switch> Using a Media Card> Save Data. Click Continue and enter a keyword in the Password field and the Confirm ulngi on. Click Save, wait until the backup process is complete.
Its just a few tips for you not lose the important data on your blackberry. I hope this tips useful for you.
Friday, August 15, 2014
How to Upload and Install Wordpress Theme
There are thousands WordPress themes, free and paid (premium) on internet. You can change the appearance of your WordPress blog become more interesting with another WordPress theme. If you want to look for free WordPress theme download references, you can go to our previous article here .
How to Install Wordrpress Theme
1. Go to WordPress Dashboard > Appearance > Themes


3. Search themes provided by WordPress, type keyword on the search box, then click "Search"

4. If youve found a theme, click on "Install Now"

5. Click "Activate"
6. Done.
How to Upload Wordpress Theme
1. Go to WordPress Dashboard > Appearance > Themes
2. Click on "Install Themes" tab

4. Browse your file by clicking on "Choose File"<br/>
5. Then, Click "Install Now"

6. Click "Activate"
7. Done.
Thursday, August 14, 2014
How to Download Free Music for Android Phone or Android Tablet

1.Get free hot music without Virus via PC
When we download things from the web, the thing we may be worried about is if it is safe. So, I just want to suggest you to record the music from the music streaming website with an audio recording tool on PC. Fresh, isn’t it? And you can just find your favorite music on the Internet and then record it and transfer it to your Android. Not complicated to get free hot music.
As for the audio recording tool, I really want you to try this music recorder. The tool can record hot audio and music going with album cover and other song tags. The source can be from computer streaming audio, many famous online music website like YouTube, AOL Music, Last.fm, etc, Mic, and other built-in input audio stream. You can use Task Scheduler to take control of the recording project. Also, it can act as a great music player for your PC. Operation is very simple and you can do it according to the guide on its website.
Strongly Recommend: Now only $9.95 for this cool music recording tool.
2.Use free Android apps to download free music for Android
Of course, there are some free Android apps letting us download free music on Android. But note that free music may be something kind of old and unpopular. Then all you need to do is download a free music downloading app, install and launch it, and finally search and download music.
For free music downloading app for Android, I would like to suggest Download free music MP3 App and MP3 Music Download Pro. Download Free music MP3 app is very simple but useful in searching and downloading millions of free music and MP3s from public search engine. MP3 Music Download Pro offers the similar service like Download Free music MP3 app, but the music can be downloaded with lyric and Album cover. The highlight of MP3 Pro is you can cut the songs you downloaded and set them as ringtones.
3.Go to Website to download free music for Android
Indeed, there are some websites which offers the free music, and benefiting from the technology, our Android smartphones and tablets can download free music from the website just like PC. You can check these safe and legal websites: Amazon, ccmixter, last.fm, freemusicarchive and more. Note that, these free music are probably not the hot music or the music on the radio.
So, what’s your choice?
Friday, July 25, 2014
How to burn The Dark Knight Rises to Blu ray
If you have never heard of The Dark Knight Rise directed by Christopher Nolan, you may be out. Since The Dark Knight Rise is released on July 20th, it has ever top the box office. Nobody can deny its a technical marvel and it brought us astonished moments. People gave much attention in it and it get popular and hot. Many people want to watch it in the theater with friends or family, even there is an article listed five reasons to watch the movie. For those who watch it in the Internet, and download the film, and want to burn the movie for a HD format and have a Blu-ray player,maybe burning The Dark Knight Rise to blu-ray is their best choice.
Undoubtedly, speaking of burn films, many people may think dvd is a good choice, but if you want a better quality and a large content, blu-ray is a better choice.And I have recently find a new leawo blu-ray creator on cnet which is remarkable.I downloaded it and have converted My loveable family videos to a blu-ray, it really works well.If you want to burn the The Dark Knight Rise to a blu-ray disc, first download and installed this blu-ray burner and following steps is provided to your reference.

1. Load your download film.
Click “add video ”to add The Dark Knight Rise. You can preview it on the right side.If you burn more videos, you can add them,and you can merge the videos casually by right click.

2. Edit the flim.
Click “Edit” button, and you will enter the editing interface, you can do some trimming and cropping, and adjust the video effect or add individualized design features through effecting and watermarking in this windows.

3. 3D setting
Maybe you want to set the 3D effects, you can do it by clicking “3D setting “button.

4. Design menu.
Click the right button “design menu” to customize your Blu-ray menu.You can set the theme,background,button and others.

5. Burn to Blu-ray disc
Click the “burn” button, and you can do some blu-ray setting on pop-up windows and click “Ok”, then the software begin to work.You can follow the process on the burning interface.


So, you have done all the operations and you have got your Blu-ray of The Dark Knight Rise. Just enjoy it with your friends.
Sunday, July 20, 2014
How to Expand Storage of Nexus 7 and Other Android tablets
Tablets are becoming more popular these days and you can do almost everything on it. Meanwhile, with the development of technology, the good quality of entertain contents, such as photos, music, movies, and games, need much storage to keep them. In general, the storage capacity of most tablets ranges between 16GB, 32GB and 64GB. Nexus 7 offers 16GB and 32 GB options without SD card.If you want more storage, then how to do it? Indeed, there are some tips helping you increase the storage of Android tablets. Following are the details.

USB OTG Cable
The USB OTG cable is a USB cable On-The-Go,allowing the mobile device connect with other USB device such as a flash drive.This way is very easy and you just need to plug the OTG cable in the Android device and the other port of the cable connects with a flash drive or a USB drive and then you can save your content to the flash drive.That means your Android tablet is the host and the flash drive acts as your storage.
Online Storage Service
For the majority, this way is the effective and simple way to get more storage capacity with storing the files online. You can find many good online cloud storage services that offer free space for you.With the app that is provided by online cloud storage service, you can easily upload and download files directly from your tablet.
Popular online storage service: COMODO Cloud(free 5GB),SugarSync(Free 5GB), Dropbox(free 2GB),Box(free 5GB),JustCloud.
Kingston Wi-Drive
When you use the online storage service, you may need a high speed internet connection, so if you think it is hard for you, you can use Kingston Wi-Drive to extend the storage. Kingston Wi-Drive hardware is a portable USB Flash storage device that allows you to wirelessly stream digital media content (such as music, photos, videos, etc.) to your Android based tablet or smartphone, available for both Apple and Android products. It offers you three two storage capacities – 32GB, 64GB and 128G.It is an easy but perfect solution for expanding storage and you just need to connect with it use the USB cable and then you can use it.
For this way, you need a Kingston Wi-Drive hardware, Wi-Drive app, a USB cable, AC adaper, an AirPlay compatible Android device.It doesn’t support 3G,
GoFlex Satellite
Just similar as Kingston Wi-Device, GoFlex Satellite device lets you wirelessly access all your movies, photos, music and documents on your Android device. It offers a larger storage capacity than Wi-Device and it works for both your tablets and PC. Better, it comes with built-in battery backup of up to 7 hours and a single USB connection specially designed for tablets. All you need do is turn on its power and connect it with your Android tablet via the USB port or wirelessly with built-in wireless network. Then you have got an external 500GB storage capacity. You can take more than Take more than 300 HD movies with the increased storage.
Read more »

USB OTG Cable
The USB OTG cable is a USB cable On-The-Go,allowing the mobile device connect with other USB device such as a flash drive.This way is very easy and you just need to plug the OTG cable in the Android device and the other port of the cable connects with a flash drive or a USB drive and then you can save your content to the flash drive.That means your Android tablet is the host and the flash drive acts as your storage.
Online Storage Service
For the majority, this way is the effective and simple way to get more storage capacity with storing the files online. You can find many good online cloud storage services that offer free space for you.With the app that is provided by online cloud storage service, you can easily upload and download files directly from your tablet.
Popular online storage service: COMODO Cloud(free 5GB),SugarSync(Free 5GB), Dropbox(free 2GB),Box(free 5GB),JustCloud.
Kingston Wi-Drive
When you use the online storage service, you may need a high speed internet connection, so if you think it is hard for you, you can use Kingston Wi-Drive to extend the storage. Kingston Wi-Drive hardware is a portable USB Flash storage device that allows you to wirelessly stream digital media content (such as music, photos, videos, etc.) to your Android based tablet or smartphone, available for both Apple and Android products. It offers you three two storage capacities – 32GB, 64GB and 128G.It is an easy but perfect solution for expanding storage and you just need to connect with it use the USB cable and then you can use it.
For this way, you need a Kingston Wi-Drive hardware, Wi-Drive app, a USB cable, AC adaper, an AirPlay compatible Android device.It doesn’t support 3G,
GoFlex Satellite
Just similar as Kingston Wi-Device, GoFlex Satellite device lets you wirelessly access all your movies, photos, music and documents on your Android device. It offers a larger storage capacity than Wi-Device and it works for both your tablets and PC. Better, it comes with built-in battery backup of up to 7 hours and a single USB connection specially designed for tablets. All you need do is turn on its power and connect it with your Android tablet via the USB port or wirelessly with built-in wireless network. Then you have got an external 500GB storage capacity. You can take more than Take more than 300 HD movies with the increased storage.
Sunday, July 13, 2014
How To Spot Fake Facebook Accounts Infographic
Facebook is the biggest social networking site but it is also home of the biggest internet scams and maximum numbers of fake profiles. Sometimes it is really difficult to understand if a Facebook profile is real or a fake one. And now with the Facebook Timeline profile, peoples privacy is not safe. So, it is always better to use the Facebook privacy features as much as possible.

Here is a Facebook infographic which tells us the basic difference between a real and fake Facebook profile on the basis of various stats. Have a look at this infographic. It will surely help you in spotting a fake Facebook profile well.
How To Spot Fake Facebook Accounts (Infographic)
Wednesday, July 9, 2014
How To Root Nokia X X XL In 4 Steps
How To Root Android Based Nokia X, X+ & XL

A Liitle Bit About Nokia X ...
Finally Nokia have understood the importance of android operating system in the smartphone market and came up with the X series of devices. Equipped with whole load of cool features and a price tag which will catch the attention of budget android users.
- Nokia X comes with a customized tile-based interface that reminds of Windows Phone. Couple that with Microsoft services such as OneDrive, Outlook and Nokia’s own Here Maps, and it’s easy to mistake this phone for a Windows Phone device.
- Nokia X just has one button below its touchscreen display. This is a back button that looks identical to the one on new Asha series phones.
- The Nokia X’s camera does not have auto-focus, which is a bit baffling considering the phone’s price. At the same time Nokia Lumia 520 priced lower than X , has auto focus facility.
- Along with a Nokia app store, where you can download many other apps and games. You can also sideload apps, meaning you can install 3rd party application by getting the apk files. But the main concern is that the app may not be optimized for X.
Warning:
- Rooting void your device warranty
- Do this at your own risk and we arent responsible for any damages occured to your device.
- Backup all necessary data before attempting any of these methods.
Root Android X :
Step 1 : Download Framaroot - Link
Step 2 : Install Framaroot on your Nokia X and then Open it.
Step 3 : Now Click On " Gandalf "
Step 4 : Reboot your device and you have rooted X/X+/XL.
You have successfully rooted your Nokia X series android phones. Comment on any difficulties.
Tuesday, July 1, 2014
How To Develop Android Applications
Android applications are written using the Java programming language, you’ll also use a custom virtual machine (Dalvik) to run and tst your creations. Dalvik is designed for embedded use which runs on top of the Linux kernal.
Below you’ll find a number of links to sites that will be of great use to you as you get to grips with the Android SDK and begin to work on creating your own applications for the platform. Information on how to develop applications, references,in-depth documentation and code snippets can all be found as you work your way through the various guides and tutorials.
An early look at the the Android SDK is also included showing you sample projects , source code, development tools, an emulator and all the libraries you’ll need to build your Android app.
Getting Started With Android
http://code.google.com/android/intro/index.html
This starter module will guide you through everything you need to know about making your first steps into developing for the platform. Talking you through the anatomy of the applications, development tools and getting you started on your first ‘Hello World’ project.
Developing Android Applications
http://code.google.com/android/devel/index.html
Android applications can be developed using the same tools used to develop Java applications. Android’s core libraries will provide you with the functions needed to build high quality rich mobile apps whilst providing you with development tools to make debugging, running and testing your applications much easier.
This module will guide you though the development proces, outlining the core philosphy behind the Android system and going over the key sections in good detail.
Developer Toolbox
http://code.google.com/android/toolbox/index.html
The developer toolbox module will walk you through how to write code that makes the most of the android systems features, allowing you to create custom components and really get to grips with the many API’s at your disposal.
Reference Information
http://code.google.com/android/reference/index.html
As you would imagine this module is made up of a good collection of reference material specificaly related to developing android applications. Details of the application framework and documentationfor the android core libraries are covered in full.
Sample Code
http://code.google.com/android/samples/index.html
Tuesday, June 24, 2014
How to Create Custom Post URL in Blogger

When you publish a post in blogger, normally you dont need to create or set an URL. WordPress has the same feature. Post URL is automatically created from post title. But sometimes it maybe too large. And sometimes it may not be possible to show the full title in the URL. As a result it doesnt carry actual meaning. In that case you can customize your post URL.
Look at the Link below:
http://www..com/2012/10/download-paid-android-apps-for-free.html
This link is related to the post- Download Paid Android Apps For Free
The title of the post carry the full meaning. You might notice that- here the URL doesnt carry the proper meaning. It only shows- how to check cell phones quality using. A user may not understand what does the post include just by URL.
But you can customize the URL in such a way so that it expresses a meaning and have precision. And certainly it will be easier for your visitors to understand what the post is all about when they just see the post URL.
You might notice the structure of an URL. There are 3 parts in the blogger URL. Such as-
- Home Page URL : http://www..com/
- Date : 2012/10/
- Post URL : download-paid-android-apps-for-free.html
Hope now you realize how your post URL is created.
If you wanna create custom URL for your post you have to use the last part. You cant omit the home URL and date. Because omitting these two parts will affect the uniqueness of your URL.
By this time you should have a proper knowledge about blogger and post URL. Now lets see how to create Custom URL :
- Make sure youre signed in to your blogger account.
- Create New Post from anywhere that you do usually.
- Look at the right- Post Settings > Permalink.
- There are two options- Automatic and Custom. Look at the image below for help.
- Type your desired words in the custom box separated by a hyphen (-) or dot (.). Remember- space, ?, !, / these are not allowed here. And try to avoid underscore ( _ ). Because it will not separate your words.
- When you finish hit on the Done button. Thats it.

Thus you can optimize your blog posts permalink for more visitors. You can also look at this posts URL for example.
- My post title is- List of Best Free Proxy Sites
- My URL is- http://www..com/2013/06/list-of-best-free-proxy-sites.html
If I didnt set a custom URL then it will somewhat like that-
http://www..com/2013/06/list-of-best-free-proxy-sites-in-2013.html
Though it carries a full meaning, but look at the URL size- Too large. So creating custom URL will also let your reduce the size of the post URL.
Hope you enjoy this post!
Tuesday, June 17, 2014
How to Install rooted 2 3 3 Gingerbread update on HTC EVO 4G
Will updating my HTC EVO 4G with the OTA while Rooted ruin my phone? Will I be able to keep my root status?
If you really want to update to Gingerbread 2.3.3 Gingerbread update but confused and do not want to lose the rooted status of your device, this simple procedure will help you out those confusion. Xhausts from XDA had already cooked the OTA Android 2.3.3 update and its already rooted.
These ROMS are based from original stock ROM update and has been modified and called ROOTED Odexed & De-Odexed ROMS.
 All you need to do is grab a copy of below ROMS and flash it through Recovery.
Stock Update
Stock ROM with SU Fix - No Wipe Needed If Coming From A Stock Sense ROM:
4.22.651.2 Rooted & Odexed - updated 06/05/11
4.22.651.2 Rooted & De-Odexed - updated 06/05/11
Firmware:
Must be flashed through hBoot/Fastboot! Not Recovery.
PC36IMG - Radio, WiMAX and PRI Updates (MD5: 2E5C63EA59891A69F6D55C257CF165D5)
View and read the original thread for further instruction.
If you really want to update to Gingerbread 2.3.3 Gingerbread update but confused and do not want to lose the rooted status of your device, this simple procedure will help you out those confusion. Xhausts from XDA had already cooked the OTA Android 2.3.3 update and its already rooted.
These ROMS are based from original stock ROM update and has been modified and called ROOTED Odexed & De-Odexed ROMS.

Stock Update
Stock ROM with SU Fix - No Wipe Needed If Coming From A Stock Sense ROM:
4.22.651.2 Rooted & Odexed - updated 06/05/11
4.22.651.2 Rooted & De-Odexed - updated 06/05/11
Firmware:
Must be flashed through hBoot/Fastboot! Not Recovery.
PC36IMG - Radio, WiMAX and PRI Updates (MD5: 2E5C63EA59891A69F6D55C257CF165D5)
View and read the original thread for further instruction.
Monday, June 2, 2014
Android 2 3 How to Safely Factory Reset a Gingerbread Device
All devices running the Gingerbread Android OS can be factory reset (or wiped) using similar steps. This tutorial describes what a factory reset actually does and how to do it safely.
What do the factory reset actually do?
The purpose of the factory reset is to wipe the device of all personal information and return the device as closely as possible to its originally purchased state. The only difference is that during the factory reset, however, the latest stable version of the Android OS will likely be installed. For example, if you are running 2.3.3 and 2.3.4 is available for your device, you will likely be upgraded to 2.3.4 when you perform the factor reset.
During the reset all personal information is removed. Optionally your SD card can be wiped as well. All applications are also removed. Android market will remember your paid applications and can optionally reinstall these applications for you. Your free applications typically will not be remembered. Even if the applications are installed to an SD card, these applications will still need to be reinstalled.
When Should I do a Factory Reset
If you are selling or returning a device, a factory reset will prevent somebody from easily stealing your personal data from the device. A factory reset is often a “last ditch” effort to get a very glitchy phone working well again.
Preparing for the Reset
1. Connect your phone to AC through some method. Running out of power during the reset could theoretically brick your phone.
2. Be sure you know your Google username and password. Be sure that Google’s backup is enabled viaSettings -> Privacy -> Back up my data
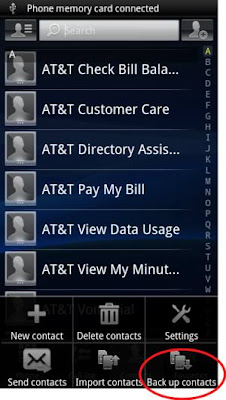
3. Export your contacts to your SD memory card if you wish. Select Contacts and then Back up contacts. Then you can select Memory card.
4. You may want to make a list of all the applications you have on your system. You can find the list through Settings -> Applications -> Manage Applications. Several free android applications will help with this process as well if you wish to try a third party option.
Wiping the Device
This process will completely wipe your device. Even if you backup everything as recommended above, you may lose some application data or settings. This is not a process that should be done lightly.
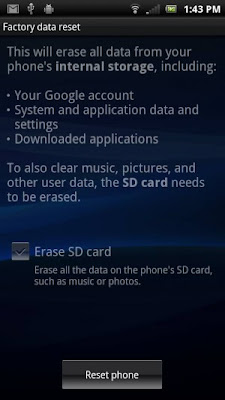
To factory reset, select Settings then Privacy and then Factory data reset.
A warning screen will next appear. From here you can select if you want the SD card in the device erased as well. Press the Erase button. You will have to confirm one last time via the Erase everything button. Your device will reboot and the reset process will be completed.
Subscribe to:
Posts (Atom)