Showing posts with label site. Show all posts
Showing posts with label site. Show all posts
Sunday, August 10, 2014
Official Company Site for online Mobile DTH Data Card Recharge and Bill Payments
If you have been looking out for websites to online Mobile, DTH, Data Card recharge across India, you might have come across a hundred of websites that offer online recharge, in the search results. And you might not be sure as to which one to choose and which is free of cost. What happens normally is there are also hundreds of such websites, which provide the online recharge service but that carries a price tag. In most of the cases, you would have to either pay money for availing the service or buy credits for online recharge.
There does exist many websites that offer the service for free. 
Here List of online Mobile, DTH, Data Card Recharge Websites:
1. BSNL
2. rcom
3. Vodafone
4. Airtel
5. tatadocomo
6. ideacellular
7. uninor
8. aircel
9. MTS India
Sunday, May 11, 2014
Add Your Blog Site URL To Google Search Listings

This is a great article which all blogger should take note of, creating nice and informative post is not the only best way to increase your blog/site traffic and ranking, but also optimizing your blog/site by submitting your blog URL to various search engines. you can submit your blog/site to Google search engine listing so your blog information on indexed, crawling and search traffic of your blog/site at Google webmaster tools.
To add your blog/site to Google simply follow the few steps below.
Go to http://www.google.com/addurl.html on your web browser.
Enter your blog/site URL and click on "Submit Request".
After you must have submit your blog/site url, login to https://www.google.com/webmasters/tools with your Google account (Gmail), after you been logged in, at the right side of your dashboard click on "ADD SITE" and fill-in your blog/site url.
Use the comment box if you have anything to say or ask.
Please share this, because its very important for every bloggers.
Sunday, May 4, 2014
How to get site blog OwnershipVerified at Google Webmaster Tools
How to get site, blog Ownership Verified at Google Webmaster Tools
Though the verification of a site or blog does not have any effect on the page rank of the owner or search results display or any other performance of the site/blog but Google gives permission to view certain details about the sites and also allows the users to use many other tools. Such information can not be shown or revealed to unauthentic persons therefore Google needs to verify the authenticity of the owner. Those who created their blogs or sites using the blogger or Google site platforms are mostly verified automatically but others need to prove the ownership of their site. The ownership verification process is very easy.
Benefits of proving Site ownership at Google Webmaster
1. Only verified user are eligible to change over to a new URL.
2. Verified users can interact with other site owners.
3. Request Google webmaster, about your site indexing preference.
4. You can use webmaster tolls to view details of your site, improve your site’s quality or diagnose problems if any.
5. The Geographic locations targeted by you may be registered with Google.
6. A crawl rate change may be requested.
How to verify your site or blog ownership at Google webmaster
1. Meta Tag – In this method a meta tag is to be added to prove your access to the source files.
You must have some knowledge of HTML but it is not a difficult job because Google will send you an example for it if you request.
2. HIML file uploading – You will have to upload a file with the name you specify. You must have
some knowledge of HTML but you need be very expert HTML editor.
3. Google Analytic code – You must login as administrator to the Google analytic account verify
using the snippet.
4. DNS Record- To use this you must be authorized to sign in to your account with your Domain Name providers.
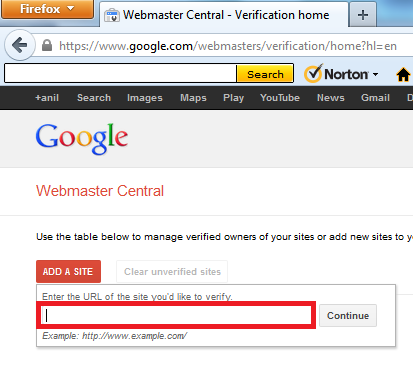
The simplest method to verify your site or blog Ownership at Google webmaster
a. Login to Google webmaster tool.
b. Click on “Add Site”
c. Type your site or blog URL incloding http:// in the box appeared.
d. Click “continue” to go to the “site Verification” Page.
e. All the options of site verification will be listed, choose one.
b. Click on “Add Site”
c. Type your site or blog URL incloding http:// in the box appeared.
d. Click “continue” to go to the “site Verification” Page.
e. All the options of site verification will be listed, choose one.
About HTML Tag
You will receive a tag like one given below. You will have ti paste it in the <head> section of your
html file. The string in red will change every time -
<html>
<head>
<meta name="google-site-verification" content="vaDxDI5oIA2R4e_bOl5T39GJrop-AgEo6UyNLBssTa8" />
<title> My title </title>
</head>
<body>
page contents
</body>
<title> My title </title>
</head>
<body>
page contents
</body>
It is easy, copy and paste the above code in your HTML file, save it and go back to the Google webmaster tool and click to verify. During your process of editing the HTML document, the Google webmaster tool site must be kept open.
Subscribe to:
Posts (Atom)